• Home
  • FAQs
  • Contact Me
  • About
  • Craft Stores I ❤️
    • Email
    • Facebook
    • Instagram
    • Twitter
    • YouTube

Creations With Christina

Picture Frame

May 24, 2011

Hi Everyone,
The library is having a big fundraiser this Friday and three of us crafty girls are each doing something to put into a raffle basket.
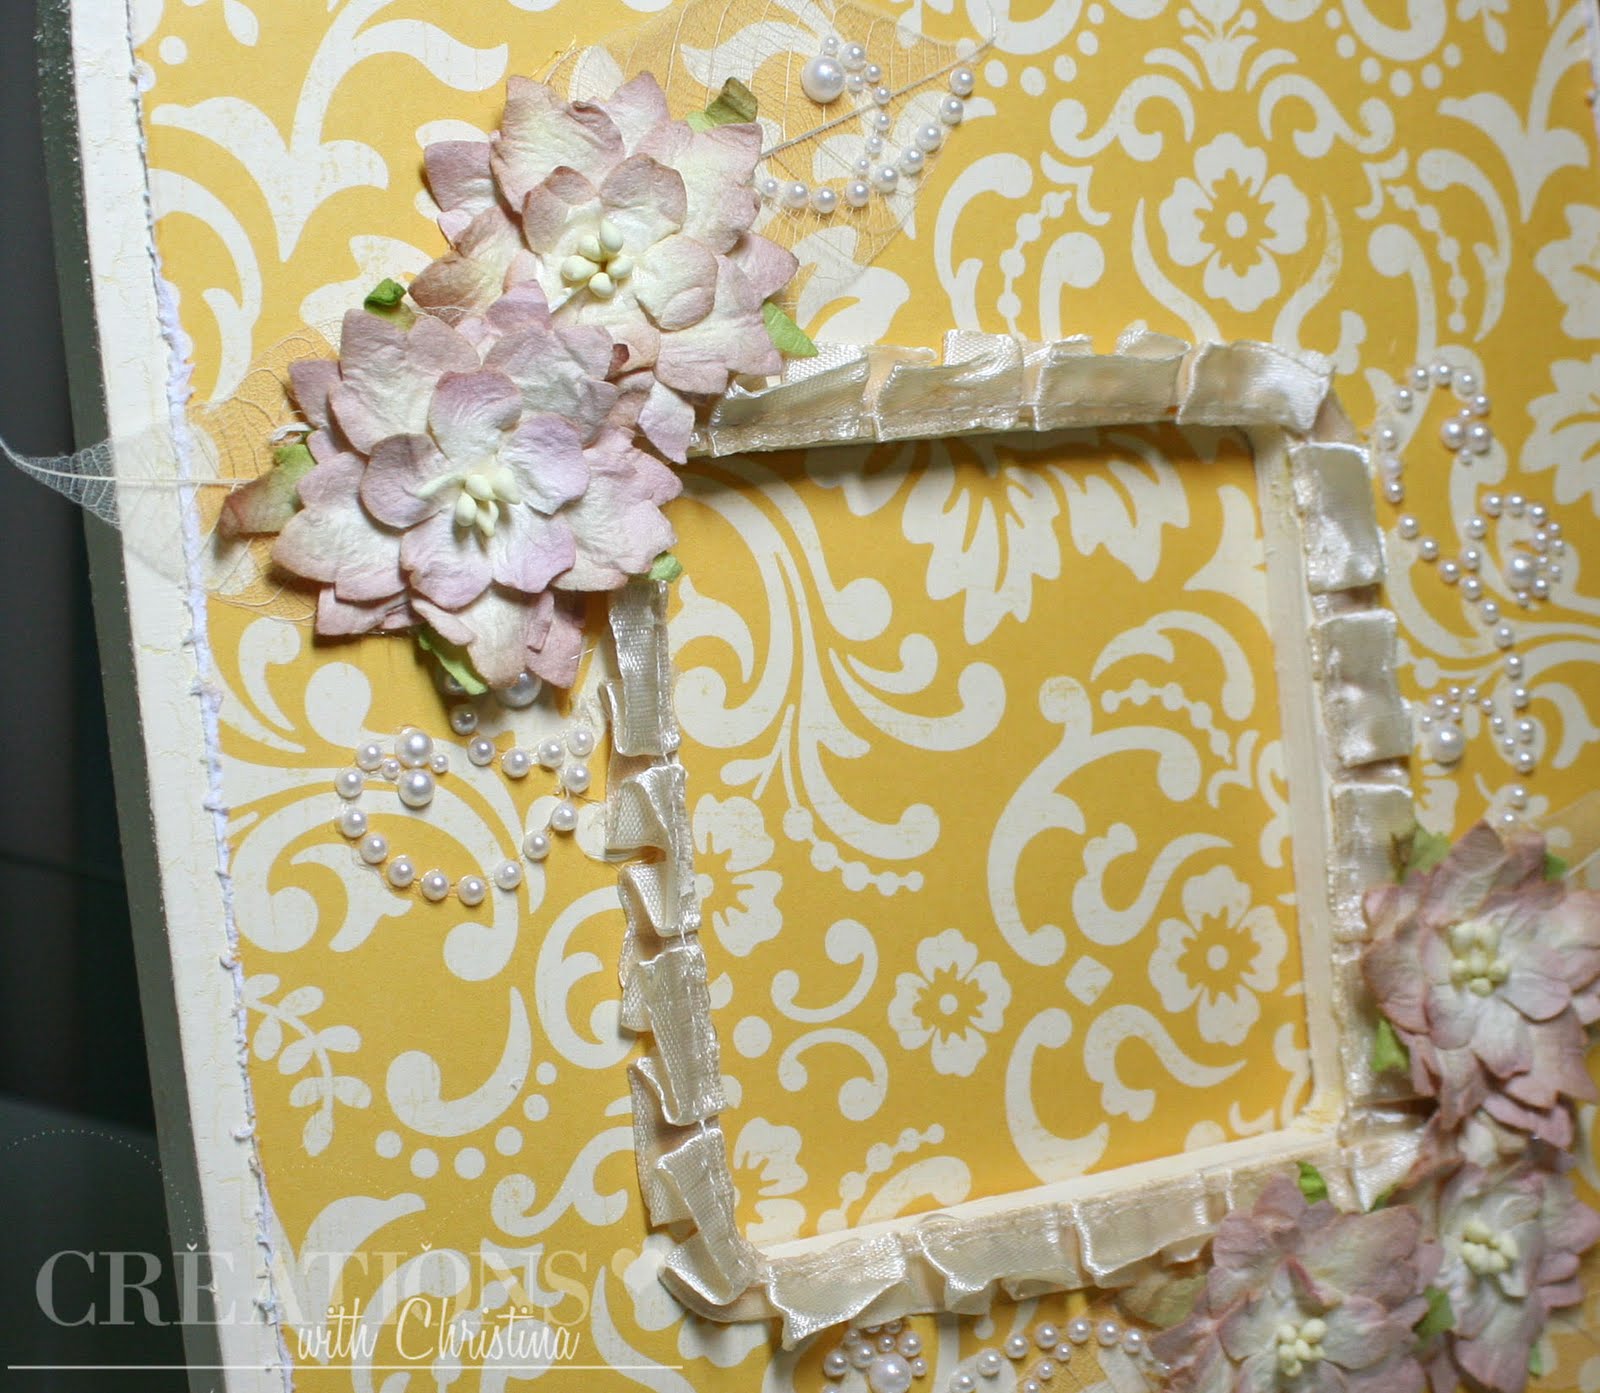
Since the party is this Friday I didn’t have time to work on a mini album so I went with a picture frame. The frame is from Michael’s wood section and holds a 3 1/2″ x 3 1/2″ photo.

 I used some pleated trim around picture area, it highlights the frame nicely and looks great with the October Afternoon “Thrifty Shop” paper. The flowers are from I Am Roses and I love them. Look at the detail in the mulberry. Stunning! I also added some skeleton leaves and prima bling.
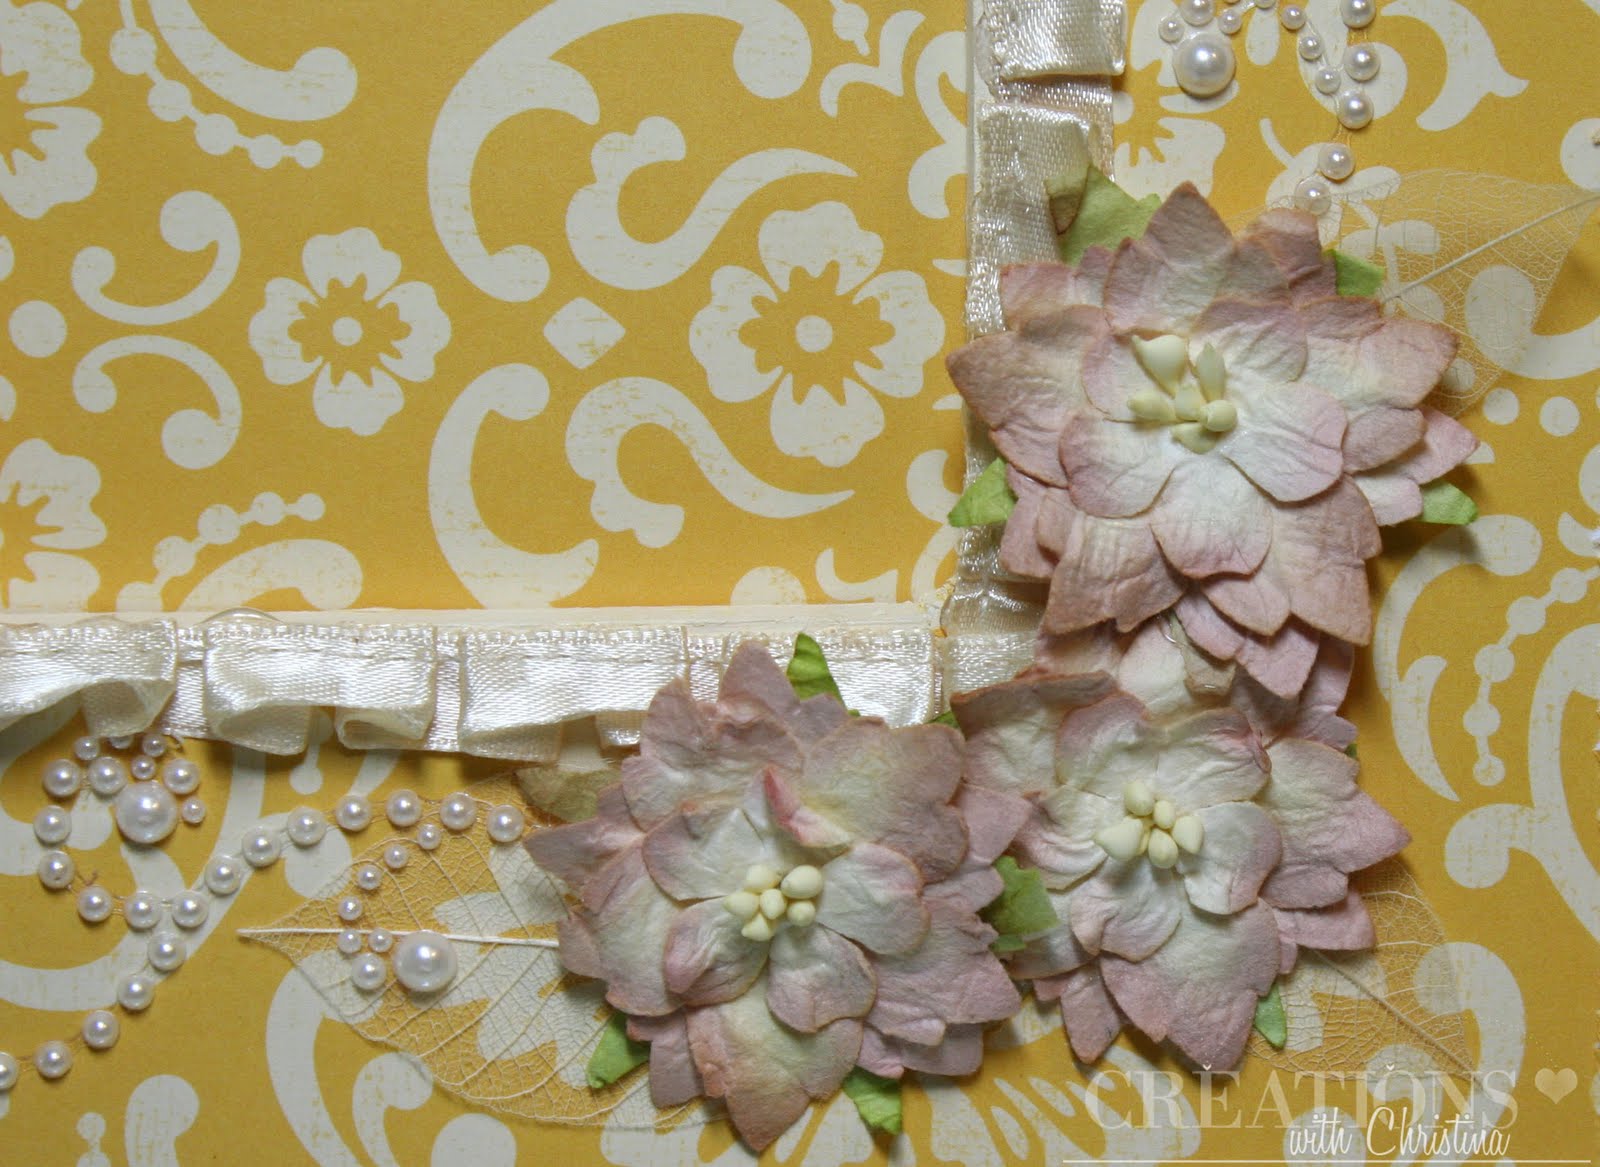
 I distressed the ends of the paper to give it a little more detail.

Well thats all for today, thanks for stopping by and I hope you have a wonderful day.
Hugs and happy crafting

Filed in: Altered Projects, Picture Frame • by Christina • 15 Comments

Another Frame

December 16, 2010

Hi Everyone,

I’m running late for work so I can’t go into the supplies used in this frame right now, but I’ll come back tonight and update it with the details…
This frame is for my Mother-in-law to give as a gift. I had made her one to go with Ethan’s school picture and I told her I would make one for her to give a friend as a gift….

Enjoy your day…

Filed in: Altered Projects, Home decor, Picture Frame • by Christina • 20 Comments

Frame

December 14, 2010

Hi Everyone,
I’m a little late posting my Tuesday project. Better late than never right? Here’s a frame I made for Ethan’s 3rd grade teacher, Mrs. K.

The Green polka dot pattern paper was a very bright BoBunny paper. I white washed it with some acrylic paint and water. Love the tone down look….I inked the edges with vintage photo distress ink.
The frame overall measures 9 in. x 7 in. and holds a 4 in. x 6 in. picture. I picked up a couple of these frames from Michaels…this one has a more angled picture area and the others are straight up and down. I didn’t think I would like the angled frame but I love it. I think a trip back to M’s to get more might be in order….

The satin ribbon is just a wide piece I had in my stash. I used some Eline Prima Pearl bling and those beautiful flowers are petals from IamRoses.com. I sprayed the flowers with Marshmallow Glimmer mist and added some mini roses (also from iamroses). Stuck behind the flowers are some small skeleton leaves (yep Iamroses) and a beaded stick pin, you probably can’t see the pin in the picture..

Well I have two more frames to work on as gifts and I’m done with those. Hope your having a great week. Maybe I’ll actually get around to those Christmas cards tonight…

Filed in: Altered Projects, Home decor, Picture Frame • by Christina • 7 Comments

Frame

November 8, 2010

Monday? What happened to the weekend? I had a somewhat crafty weekend….Saturday I finally set my room the way I wanted it to look. I’ve been looking at a wall since I’ve had my own craftroom and I always kept it that way because of how I film my videos. Scott came up with a solution to filming (it’s on order) and I get to stop starring at walls 🙂 Depending on how long it takes to ship and when it gets here, I may not have any videos this week? Which is OK because I’m going to spend some time this week getting my list of videos straightened out and work on some other projects I have in the works….

Have you all seen the amazing frames that Teri has been making? The frame can be found at Michael’s in the wood section and measures 12×12 and holds a 5×7 picture. As soon as I saw the first frame Teri made I had to make one. This frame is for Scott’s parents, check out that cutey in the picture. I can’t believe he’s in 3rd grade already.

I’ll try to remember the supplies: I started it two weeks ago and finally finished it up this weekend:
Supplies:
Wood Picture Frame (Michaels), Crackle Medium, Red paint, Black Paint, Pattern Paper (Graphic 45 Playtime Past), Paper Trey Ink: It’s official stamp set, torn page die, and twine. Tim Holtz, on the edge file tab. Denin material, Sakura White Gel Pen, Don Juan Cricut Cartridge (Stars) 
and a whole lotta love 🙂 

Filed in: Altered Projects, Picture Frame, Scrapbooking • by Christina • 25 Comments

Picture Frame

February 24, 2010

I started making this frame just for fun. It’s one of those $1.00 wooden frames you can find at Michael’s.

I painted the frame with a off-white acrylic paint then layered Bazzil cardstock with some My Minds Eye pattern paper. I did a zig zag stitch around the outside and inside of the pattern paper.  I really really love how it came out. 
I cannot stop making these flowers. I wanted to show you a close-up of the flower so you can see the “Diamond Dust” I added. Diamond Dust can be found at Michael’s in the adhesive aisles. Have you seen the Prima flowers at Michael’s that have the water drop look? Well this is what you use. Just think off all the flowers you can make…If you haven’t seen my video on how to make these flowers click HERE
Have a great Wednesday!

Filed in: Altered Projects, Grunge Flower, Picture Frame • by Christina • 25 Comments

About me

Hi! My Name is Christina and welcome to my little place on the Internet!
SUBSCRIBE TO MY NEWSLETTER
  • Email
  • Facebook
  • Instagram
  • Twitter
  • YouTube

Search My Site

Categories

Birthday card button press Cards Craft Room craftroom Craft Room Organizing crafts Cross Stitch Die Cutting Easter Card embossing folders embroidery Friday Card Series hot foil system organization reviews shadow box Spellbinders stencils Sublimation Tutorials valetine's day Videos

Instagram

Disclaimer

Photos and artwork shown here are property of Christina Thomas (except where indicated). Use of my photos and/or artwork is for personal inspiration only and may not be copied for commercial advertising, challenges, contest submissions, publications or resale. Feel free to link my blog to yours. No permission needed.

Instagram

🎸 Sometimes the best creative projects come from r 🎸 Sometimes the best creative projects come from rediscovering what we already have! While organizing my craft room, I found this mini guitar die set and a music stamp set that were meant to be together. 🎶
Watch the full tutorial on my YouTube channel (link in bio) to see how I made this card step-by-step. No shopping trip required—just creativity and a fresh look at what you already have! ✨

#cardmaking #papercrafts #diecutting #createandinspire #shopYourStash #musiccard #guitarcard #handmadecards #crafting #cardmakersofinstagram #papercrafting #craftroomorganization #creativeprocess #diyCards #stampinganddies #simonsaysstamp #spellbinderspaperarts
Who says you need new supplies to make beautiful c Who says you need new supplies to make beautiful cards? In my latest video, I'm showing you how to create a stunning handmade card using ONLY what's already in my craft stash! No shopping required.  Watch the full tutorial on my YouTube channel (link in bio) and don't forget to subscribe for more stash-friendly card making ideas! 💕
#handmadecards #papertreyink #concordand9th #simonsaysstamp
Happy New Year, everyone! I'm so excited to kick o Happy New Year, everyone! I'm so excited to kick off 2026 with a brand new video on my YouTube channel!🧵✨ 

I just posted my complete Works in Progress (WIP) Parade where I'm showing you ALL the cross stitch projects I'm bringing into the new year. Some are close to finishing, others... well, let's just say they're long-term companions! 😄

Head over to my channel (Link is in bio) to see what's on my stitching table and join me for this fun project tour. I'd love to hear how many WIPs you're carrying into 2026 - drop a comment on the video!

#crossstitch #wip #2026stitching #flosstube #crossstitchcommunity #crossstitch #crossstitchlovers❤️ #crossstitch_inspiration
On a rainy Sunday, I experimented with unused supp On a rainy Sunday, I experimented with unused supplies from my collection. In today's video, I'm working with Layered Stencils and the adorable Berries and Jam stamp and die set from Concord and 9th. 
You can watch the video on my You Tube Channel, the link is in my profile. #concordand9th #diycards #handmadecardsideas #handmadecardsofinstagram #handmadecardsarebest #layeredstencils
I'm excited to share a clean, simple, and easy-to- I'm excited to share a clean, simple, and easy-to-create card with you today! I had fun experimenting with both new supplies and ones that have been patiently waiting in my craft room. Watch the video using the link in my profile. #handmadecardsideas #handmadecardsarebest #diycards #spellbinders #handmadecardsofinstagram
Hello everyone! I hope you're all having a wonderf Hello everyone! I hope you're all having a wonderful start to the New Year! I'm absolutely thrilled to share an exciting creative project that I recently completed for @teamspellbinders . This particular piece was crafted using the beautiful and intricate dies from this month's Stitched Die Club collection. After experimenting with different possibilities, I decided to make my creation into a decorative tag.

Copyright © 2026 · Theme by Blog Pixie


Loading Comments...